Hey,
Recently, HAProxy 1.8 got announced, and it came with some pretty good news:
HTTP/2 is automatically detected and processed in HTTP frontends negotiating the “h2” protocol name based on the ALPN or NPN TLS extensions.
At the moment the HTTP/2 frames are converted to HTTP/1.1 requests before processing, so they will always appear as 1.1 in the logs (and in server logs).
No HTTP/2 is supported for now on the backend, though this is scheduled for the next steps.
HTTP/2 support is still considered EXPERIMENTAL, so just like for multi-threading, in case of problem you may end up having to disable it for the time it takes to solve the issue.
If you’re already making use of TLS with HAProxy, HTTP/2 support should be a piece of cake.
- The example
- Building HAProxy from source
- Generating certificates
- Setting up HAProxy with HTTPS support
- Using Wireshark to debug the traffic
- Enabling HTTP2 in HAProxy
- Inspecting the HTTP2 traffic
- Extra - Installing CURL with HTTP2 support
- Closing thoughts
The example
The whole blog post is centered around the idea of putting HAProxy as a reverse proxy for a service that sits behind the test.com domain.

As mentioned in the announcement, all the traffic that flows into HAProxy as HTTP/2 gets translated to HTTP/1.1 requests before processing, meaning that you can put your HTTP/1.1 server as a backend service without any problems.
Another consequence of the HTTP/2 to HTTP/1.1 translation is that all the http mode directives that you have in the haproxy configuration are still valid and you don’t need to change them.
Building HAProxy from source
If you’re a MacOS user and don’t want to wait until the HAProxy Brew formula gets updated, or just don’t want to wait for the official HAProxy docker image either, it’s pretty straightforward to build it from source.
For either macOS or Linux, the first steps are all the same. The only difference comes at the moment of running make (different flags are needed):
# Set the version that we'll download
HAPROXY_BRANCH="1.8"
HAPROXY_VERSION="1.8.4"

# Retrieve the release of HAProxy
curl -SOL http://www.haproxy.org/download/$HAPROXY_BRANCH/src/haproxy-$HAPROXY_VERSION.tar.gz

# Untar it
tar xzf ./haproxy-$HAPROXY_VERSION.tar.gz

# Get into the directory
cd ./haproxy-$HAPROXY_VERSION
With the directory ready, now it’s time to run make with the appropriate flags.
# Install (or upgrade) openssl:
brew upgrade openssl
==> Upgrading openssl

# Once the install is finished, brew will tell you where to
# look for the openssl headers (include) and the compiled
# library that you can use with software that requires it
# (in our case, HAPROXY)
...
For compilers to find this software you may need to set:
    LDFLAGS:  -L/usr/local/opt/openssl/lib
    CPPFLAGS: -I/usr/local/opt/openssl/include
For pkg-config to find this software you may need to set:
    PKG_CONFIG_PATH: /usr/local/opt/openssl/lib/pkgconfig


# Start the actual compilation.
#
# These options can be looked up at the Makefile file.
#
# We're essentially telling it to use some default options for
# OSX as well as specifing that we want a specific regex library
# (pcre), enable use of OpenSSL and zlib support to provide us
# support for deflate (gives us gzip compression).
#
# SSL_* options tells the compiler where to look the symbol
# declarations and definition.
make -j6 \
USE_ZLIB=1 \
USE_PCRE=1 \
USE_OPENSSL=1 \
SSL_LIB=/usr/local/opt/openssl/lib \
SSL_INC=/usr/local/opt/openssl/include \
TARGET=osx


# Verify whether the binary has been compiled with  all the
# properties that we need.
./haproxy -vvvv
HA-Proxy version 1.8.4-1deb90d 2018/02/08
Copyright 2000-2018 Willy Tarreau <willy@haproxy.org>
Build options :
  TARGET  = osx                                         <<<<
  CPU     = generic
...
Built with OpenSSL version : OpenSSL 1.0.2n  7 Dec 2017
Running on OpenSSL version : OpenSSL 1.0.2n  7 Dec 2017 <<<<<<
OpenSSL library supports TLS extensions : yes           <<<<<<
OpenSSL library supports SNI : yes                      <<<<<<
OpenSSL library supports : SSLv3 TLSv1.0 TLSv1.1 TLSv1.2 <<<<<
Built with transparent proxy support using:
Encrypted password support via crypt(3): yes
Built with PCRE version : 8.41 2017-07-05               <<<<<<
Running on PCRE version : 8.41 2017-07-05               <<<<<<
PCRE library supports JIT : no (USE_PCRE_JIT not set)
Built with zlib version : 1.2.11                        <<<<<<
...
Available polling systems :
     kqueue : pref=300,  test result OK                 <<<<<
...
If you’re on Linux, the process is mostly the same. Add some dependencies, switch some parameters when building with make and you’re good to go.
# Update the package information from all the configured
# sources.
sudo apt update -y

# Install the dependencies
sudo apt install -y \
        openssl-dev \
        zlib-dev \
        libpcre-dev

# Perform the actual compilation
make -j6 \
TARGET=linux2628 \
USE_OPENSSL=1 \
USE_ZLIB=1 \
USE_PCRE=1
ps.: if you also need Lua and is curious to know how to integrate HAProxy with Letsencrypt, make sure you check how to get TLS certificates with Letsencrypt and HAProxy. There I build both HAProxy and lua from scratch on an Ubuntu 17.04 box.
Generating certificates
As browsers only implement HTTP2 over TLS, we must have some certificates in place if we want to test HAProxy HTTP2 support using a web browser.
The process of generating self-signed certificates (for tests) is far from difficult though - all we need to do is call openssl with some arguments:
openssl req \
        -x509 \
        -sha256 \
        -newkey rsa:4096 \
        -keyout "test.com.key" \
        -out "test.com.pem" \
        -days 730 \
        -nodes \
        -subj "/C=BR/ST=SaoPaulo/L=SaoPaulo/O=TestOrg/OU=TestUnit/CN=test.com"
Generating a 4096 bit RSA private key
...............................................................................................................................................................................++
...........................++
writing new private key to 'test.com.key'
-----
With the certificate written to the test.com.pem file (and the private key to test.com.key), we inspect the certificate and make sure that what we want is set up:
openssl x509 -in ./test.com.pem -text -noout

Certificate:
    Data:
        Version: 1 (0x0)
        Serial Number: 17902607379759041757 (0xf872d68f4fd30cdd)
    Signature Algorithm: sha256WithRSAEncryption
        Issuer: C=BR, ST=SaoPaulo, L=SaoPaulo, O=TestOrg, OU=TestUnit, CN=test.com
        Validity
            Not Before: Mar  1 13:47:12 2018 GMT
            Not After : Feb 29 13:47:12 2020 GMT
        Subject: C=BR, ST=SaoPaulo, L=SaoPaulo, O=TestOrg, OU=TestUnit, CN=test.com
        Subject Public Key Info:
            Public Key Algorithm: rsaEncryption
                Public-Key: (4096 bit)
ps.: I’ve created a little script that helps provisioning certificates that bundle multiple domains (via SAN - Subject Alternative Name): cirocosta/certgen. It’s a one-file bash script that automates the process
Having the certificate and its associated private key created, we must create the final file that HAProxy uses to terminate the TLS connections. THis file is a combination of both the private key and the certificate. From the configuration manual:
[crt…] designates a PEM file containing both the required certificates and any associated private keys.
This file can be built by concatenating multiple PEM files into one (e.g. cat cert.pem key.pem > combined.pem).
In our case, just concatenate those two:
# Concatenate the certificate and the private key
# such that HAProxy can deal with a single file
# that has both of them.
cat ./test.com.pem test.com.key > haproxy_test.com
With the certificates set, let’s jump to HAProxy.
Setting up HAProxy with HTTPS support
First, we’ll set up HAProxy to route requests from HTTPS to an HTTP backend.

global
# Setting the maximum size of the Diffie-hellman parameters
# used in the TLS negotiation such that HAProxy won't warn us
# about the low default value of 1024.
                tune.ssl.default-dh-param   2048


defaults
# As we're sticking with using HTTP/1.1 all the way
# we can set the mode in the `defaults` section and
# have it applied everywhere.
#
# If you set only in the frontend, then haproxy will
# complain about letting backend be tcp.
                mode http


frontend        https
# Binding to port 443 forces us to have higher privileges
# when launching HAProxy, but it allows us not to have to
# set the `:<port>` in the URL when connecting to it using
# a browser (as `https` will imply port 443).
#
# The certificate set here is the one that contains both the
# private key and the actual `.pem` that we generated using
# openssl.
#
# ps.: if you have *a bunch* of certificates to serve, then
# you should switch to `crt-list` as HAProxy has a limit on
# the size of each line in this config file.
                bind                        *:443  ssl crt /tmp/sample/certs/haproxy_test.com

# Simple ACL to send traffic to our custom tailored web server.
#
# This way we can exercise a "not found" when not having `HOST`
# properly set.
#
# This also demonstrates how HAProxy is indeed decyphering the
# traffic (otherwise it wouldn't catch the Host header).
                acl                         host_matches hdr_dom(host) test.com
                use_backend                 desired_backend if host_matches
                default_backend             not_found


# Our server that serves `/tmp/sample/www` using python's
# SimpleHTTPServer module.
backend         desired_backend
                server                      myserver localhost:8000


# A dumb "not-found" auto-responder using HAProxy's errorfile
# directive.
#
# As the ACL that send traffic to this backend is the default
# (and least prioritized), when we reach this backend, it means
# that we didn't find a desired backend, thus we should serve
# a 404 instead of the generic 503 that haproxy gives back to
# clients when something goes wrong.
backend         not_found
                errorfile                   503 /tmp/sample/errorfiles/404.http
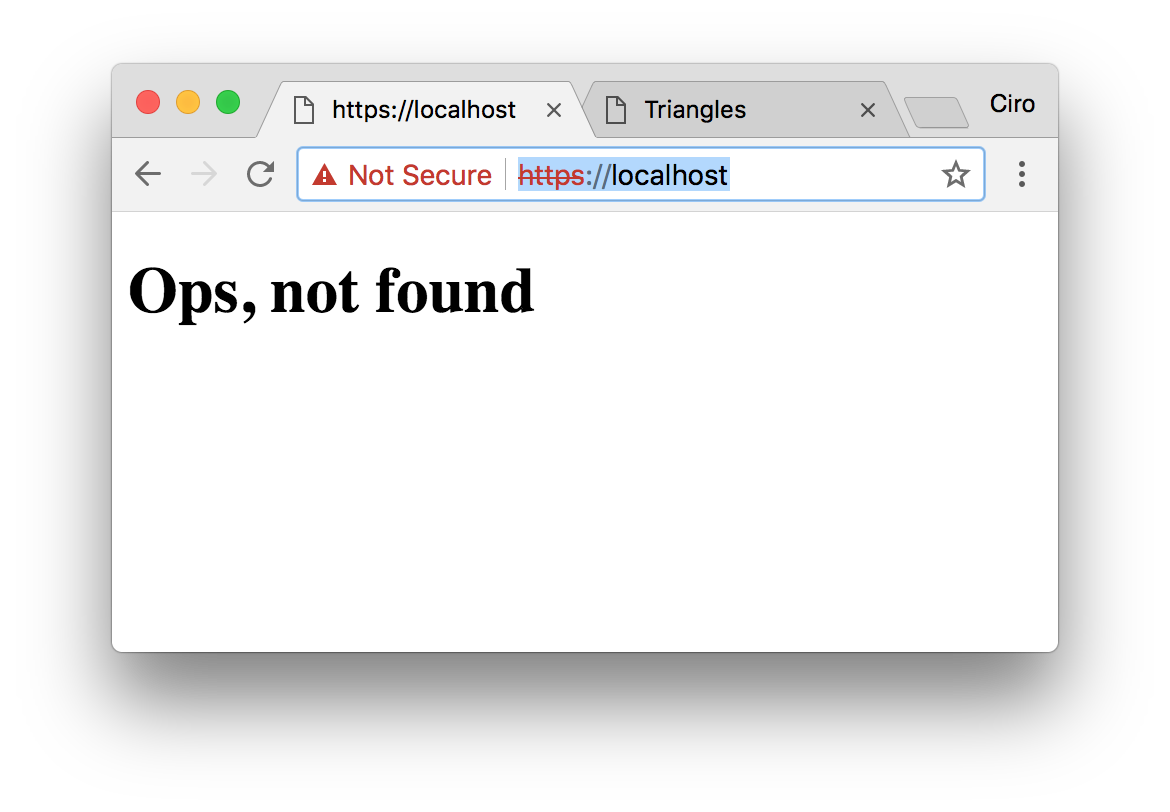
Run HAProxy and head over to https://localhost.
At this moment you should see HAProxy serving the HTTP response defined in the errorfile (404.http).
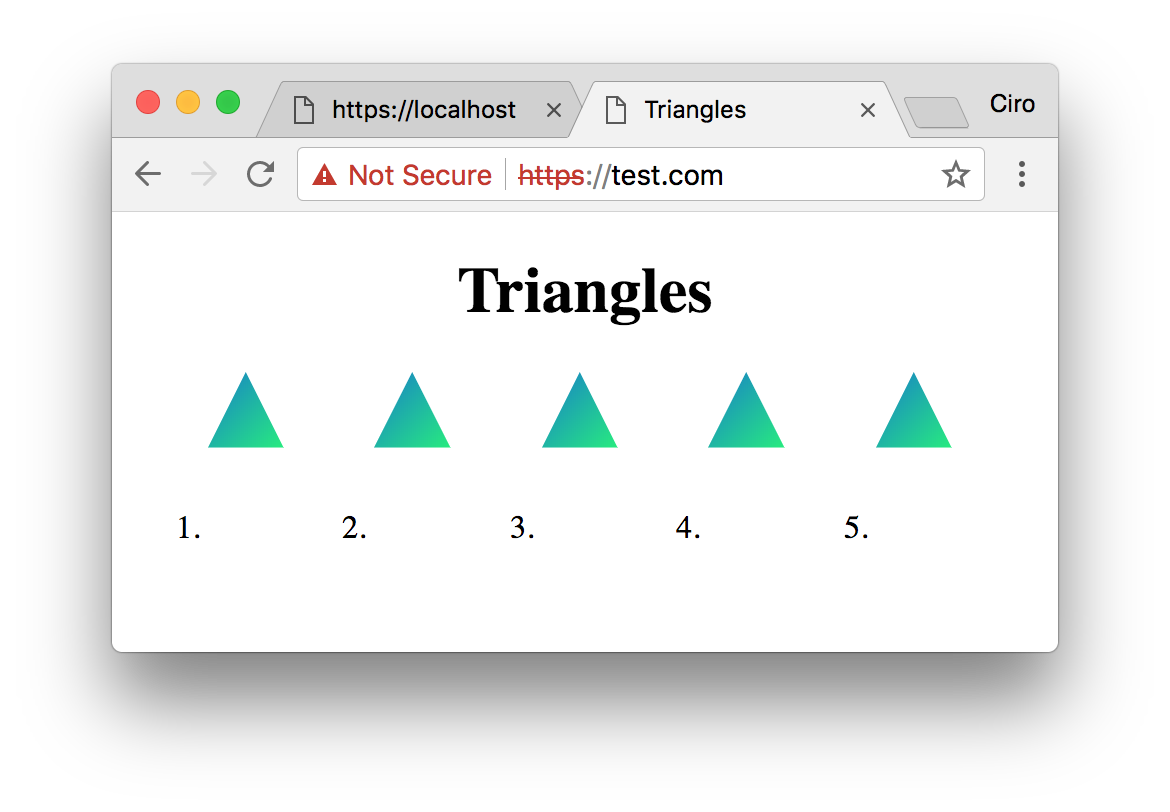
Now, change your /etc/hosts (or local DNS) to contain an entry for test.com and head to https://test.com: now you should see the page being served.
With TLS termination going on, debugging becomes a bit hard without providing extra help for Wireshark.
Using Wireshark to debug the traffic
To have Wireshark being able to interpret the traffic, we must provide it the keys to decrypt the whole traffic.
SSLKEYLOGFILE=~/tlskey.log \
        /Applications/Google\ Chrome.app/Contents/MacOS/Google\ Chrome &

# go to your website ...
# check what Chrome put in the file

cat tlskey.log
CLIENT_RANDOM d3245ce2f3eabc7895a99c66de03d30be1f8798fe5401dd10dcdf0b2db566e33 2adf73c515bb4fc0171b19f991a6aaecd3899c18fb83f162f926f6239f8e76c431a01d379ede29a4ae31bd37dcb48964
CLIENT_RANDOM 6b8148cc629e9a605f58e13c7a57feaecfb54db2365991c7316cc7705a9fff8b 8c2d1a94f7e8d4b65e115230e725cdda022fda8eefd4f235dde977c3ce7c0b52f95ddd9958193e18ea2b60afb6274a2a
CLIENT_RANDOM 4c6a4da0b4bc5985180c8eb7bc4264d1794a24e4c19c8b1e8bbfe544f737f67d 367b1594d6903a0a93f1b145bf321bb8740df860abdabfd3ef44dce118bed8c92a49a03a1d740f6cd22b4934d1174466
CLIENT_RANDOM d8316ea981c4bf35636c185b186af42dc257ce9b88752f9f9848150298433b9b 1742b4d08c170bf86a70c44130d782db173db32446d5350295395e5ed2c787b5f79772c7f48910b12d0223d85dd5dec0
CLIENT_RANDOM 93ffc7c33a0a38476266961d7eb2c3b7e62ca41db99129f50648779871170feb c8dc729c7f0a3ef195fe856d2fd8f081d0d9519c52ca87eaa9e33c8c77bb8619f691cb99c9ba9ba8ef4968ce97e74d32
CLIENT_RANDOM 27b31452a53d48abfa322f931e0f7a65e5ad846cd682005a9b52a579c03703c1 13121dc8cf9c012f4d5f27a93a2281d3769a3566926ebed7c4fd7ab7d11ae16f210e9268befad340b3d2803f44a5b570
CLIENT_RANDOM 322c12247007fc09a4ddff6ab8c8256b8cb40bc6c82769cde936d28e812c8ced 4455a438772c75fb685418a46801ad63b61459801d217669c7b9ed371ed2959e9da0180dd749496e83f8a78996781b98
CLIENT_RANDOM 3cde72add3576eb96f4cdf7820e2555188a500ea816f835112feb5d195c91c10 34d07cd567fb9287dad18df4c31e3b38f602d8e2ed668942bad45858c76243f4d3f9f0012ca56f1fd5f4fb2ddaafd125
CLIENT_RANDOM 5d6baf61132868f69136415114c9cf2b1134bb509669899cb3ed23610f7d4b5d 1f584a5d6407bc5b2eecef36480af8d4adfb8481cb0e74b8e91f05b3501d4101db34eb47a76edb248b3f73cc1bad005c
With this, we’re already able to decrypt TLS traffic.
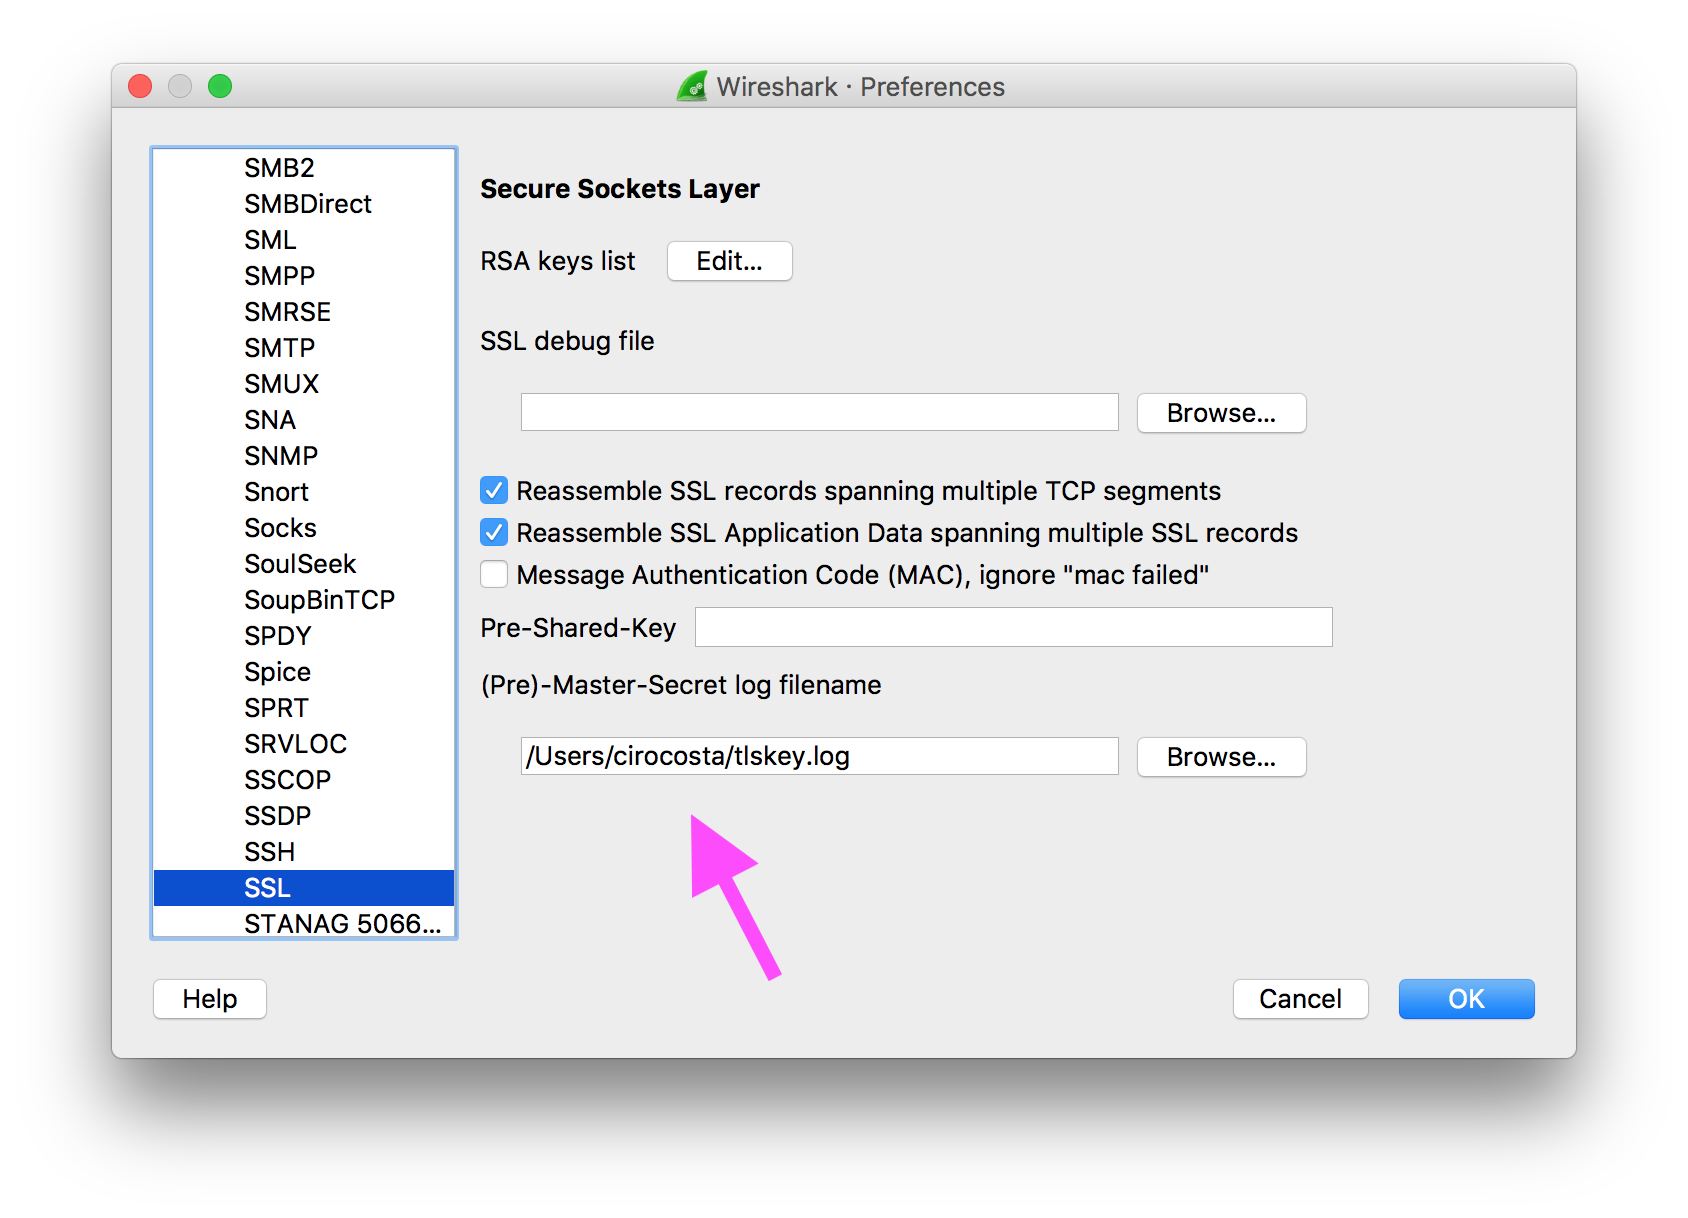
Open Wireshark’s preferences (cmd + , ), head to Protocols > SSL and then change (pre)-Master-Secret log filename to the filename you specific in SSLKEYLOGFILE.
Run HAProxy and navigate to the website - you should be able to see the traffic in wireshark:

Enabling HTTP2 in HAProxy
Once HTTPS has been set up, enabling HTTP/2 in HAProxy is a matter of including the alpn h2 directive to the bind line such that whenever the browser tells HAProxy that it can take HTTP/2 traffic, HAProxy does the job of serving it.
 # ... defaults configuration ...

 # HTTP2 frontend server from https portj
 frontend        https
-     bind  *:443  ssl crt <certificate>
+     bind  *:443  ssl crt <certificate> alpn h2,http/1.1
Now, reload HAProxy with the new configuration and the traffic should be served via HTTP/2.
To make sure that that’s the case, get to https://test.com and open the HTTP/2 tab of chrome://net-internals:

There we should be able to see the HTTP/2 session originated by Chrome to HAProxy which proxies the requests to our HTTP/1.1 server.
Inspecting the HTTP2 traffic
To have a better view of what goes on, we can make use of Wireshark.
Unlike with plain HTTPS though, to inspect these HTTP2 streams we must first make sure that our operating system trusts the server certificate.
Using MacOS and Chrome, you can head to the Security tab in the developer tools and then open “view certificate” to open the certificate popup.

With that popup open, drag the certificate to your desktop and open it (it’ll ask for your password and launch Keychain Access).
Once keychain is open, perform a right click on the test.com certificate and then click on get info. This should open a new popup.
Now it’s a matter of making MacOS trust the cert:

With the certificate trusted, now we can go back to Wireshark and see the HTTP/2 streams (notice that Chrome might still tell you that the certificate is not secure as it’s a self-signed certificate, but that’s ok):

Extra - Installing CURL with HTTP2 support
curl by default doesn’t come with HTTP/2 support out of the box, and if you’re using MacOS and didn’t specify an extra flag, that’s for sure. As mentioned on the official website:
libcurl uses this 3rd party library for the low-level protocol handling parts. The reason for this is that HTTP/2 is much more complex at that layer than HTTP/1.1 (which we implement on our own) and that nghttp2 is an already existing and well functional library.
So, to have HTTP/2 enabled with Curl, you need to build it with nghttp2 (see HTTP/2 with curl).
Using brew, it’s very simple to have that though.
The brew formula for curl supports an extra flag that installs it for you:
# some other options ...
  option "with-gssapi", "Build with GSSAPI/Kerberos authentication support."
  option "with-libmetalink", "Build with libmetalink support."

#        \/ \/ what we want!
  option "with-nghttp2", "Build with HTTP/2 support (requires OpenSSL)"
This means that you’d go to Terminal and install it like this:
# install cURL with nghttp2 support
brew install curl --with-nghttp2

# link the formula to replace the system cURL
brew link curl --force

# reload the shell and then issue a request against
# our `test.com` server specifying the `-k` to allow
# any certificates:
curl -k https://test.com -v

* Rebuilt URL to: https://test.com/
*   Trying 127.0.0.1...
* TCP_NODELAY set
* Connected to test.com (127.0.0.1) port 443 (#0)
* ALPN, offering h2             <<<<< negotiating HTTP/2
* ALPN, offering http/1.1
* Cipher selection: ALL:!EXPORT:!EXPORT40:!EXPORT56:!aNULL:!LOW:!RC4:@STRENGTH
* successfully set certificate verify locations:
*   CAfile: /usr/local/etc/openssl/cert.pem
  CApath: /usr/local/etc/openssl/certs
* TLSv1.2 (OUT), TLS header, Certificate Status (22):
* TLSv1.2 (OUT), TLS handshake, Client hello (1):
* TLSv1.2 (IN), TLS handshake, Server hello (2):
...
* Using HTTP2, server supports multi-use                <<<<< HTTP/2
* Connection state changed (HTTP/2 confirmed)
* Copying HTTP/2 data in stream buffer to connection buffer after upgrade: len=0
* Using Stream ID: 1 (easy handle 0x7ff354804400)
> GET / HTTP/2
> Host: test.com
> User-Agent: curl/7.56.1
> Accept: */*
>
* Connection state changed (MAX_CONCURRENT_STREAMS updated)!
< HTTP/2 200
< server: SimpleHTTP/0.6 Python/2.7.10
< date: Thu, 01 Mar 2018 18:06:30 GMT
< content-type: text/html
< content-length: 423
< last-modified: Thu, 01 Mar 2018 15:31:02 GMT
<
<!DOCTYPE html>
<html>
  ...
Closing thoughts
It’s cool to see how easy is to have a basic HTTP/2 setup with HAProxy. Although it’s not the new kid on the block, it’s catching up regarding features with other more recent load-balancers.
It still lacks server push and full HTTP/2 support (it can’t connect via HTTP/2 with a backend), but it can already deliver great results.
Please let me know if you spot anything off; I’m @cirowrc.
Have a good one!
finis